Main Menu
- Home
- Products
- Applications
- Product Support
- Service
- Learn
- Product News
- About Us
- Contact Us
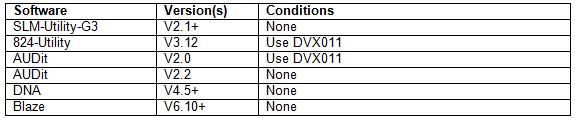
Windows 7 & 8 Compatible software
Windows 8 installation notes
Some software requires a library from Microsoft, VC Redistributable, to be installed prior to installing the Larson Davis software. When using Windows 8, the user is required to reboot the PC after installation of this software component. When prompted to reboot, select yes. Failure to reboot will cause an SLMserver.dll installation error to occur although a reboot will clear this up. After rebooting, the installation will automatically restart and finish.
For DNA to install properly, SLM Utility G3 must be installed first
XP mode is not available for Windows 8 but there are other, third party products available to create a virtual PC if support is needed for old software like SLM Utility (812/820). One such option is Virtual Box, https://www.virtualbox.org/ , that is available for free. Once virtual box is setup, then a legal copy of Windows XP still needs to be installed.
Which unsupported operating systems are known to have problems and not work?
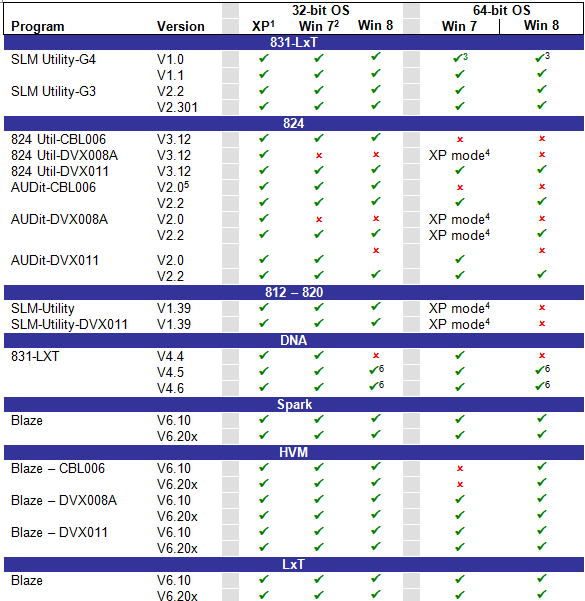
XP Mode Notes
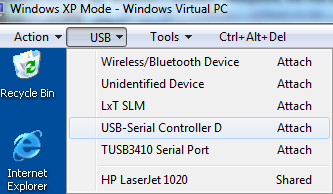
Download and install Windows XP Mode, http://windows.microsoft.com/en-US/windows7/products/features/windows-xp-mode . This is a large download, approx 500 MB but once installed, these programs will work
When Installing Windows XP Mode there are instructions at the link above but key things to know
A change of internal 824 memory may cause the message ‘Analog Cal Bad’ to appear.
The ‘analog cal bad’ can usually be field reprogrammed in the model 824.
Email Download Example: Attached are the original offset values for 824 snxxxx to reprogram:
1) Copy the attached file .CBK to your 824Util (v 3.12) software folder on your PC.
2) Run 824Util and connect to the 824
3) In 824Util Select File, Upgrade, Firmware/Options
4) Browse and click on the 824axxxx.cbk
5) Check on Apply Firmware, Press Start
6) After completion of reprogramming, do a microphone SPL calibration, and then store to EEPROM using TOOLS, MEMORY, Create EEPROM Backup.
The contents of a calibration file .CBK for model 824 sn 3104 is :
Dump of Cal Block for 824:A3104
Version: 5
CalOffset: -47.0781
Bias_OS: -0.0039
TEMPOFFSET: 58.0586
HighDynRangeOS: -0.3004
ChanWghtOS: -0.2500
Options Masking on Model 831 and SoundTrack LxT
Using the SLM Utility-G3 you can “mask” installed firmware options to simulate other instrument configurations. The mask can also be controlled on the instrument in tools -> System Properties -> Options tab. This is a handy tool for customer demonstrations or technical support, when you wish to configure an instrument with certain options.
Here is how you do it. In the System tab, select Mask Installed Options.
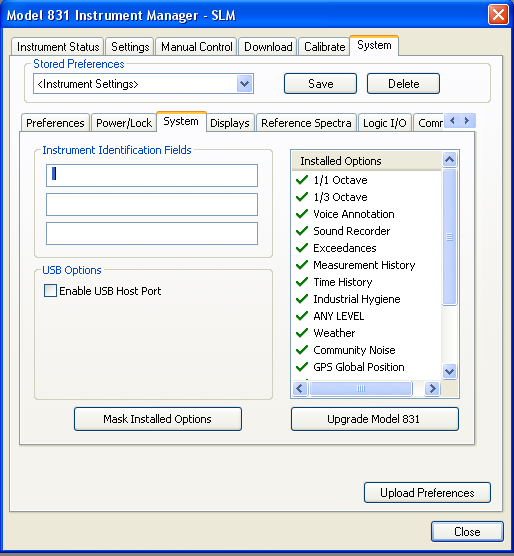
This leads to the following screens where you can, for example, uncheck flags to have only LOG + OB3 + SR.
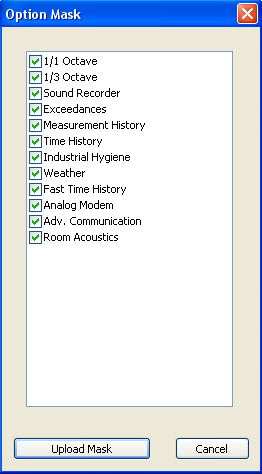

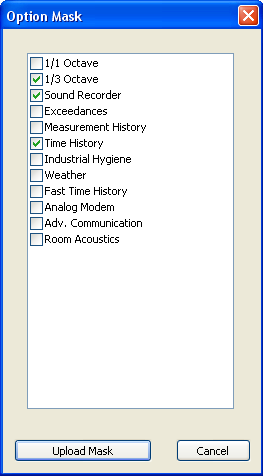
Next you UPLOAD mask.
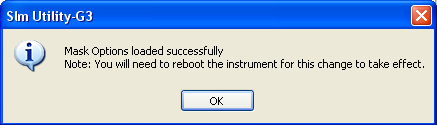
Close the window, disconnect G3, turn off the 831 and reboot it. When you reboot and reconnect to G3, check to see that the MH / ELA is turned off. Re-establish the options with the reverse procedure or a “Format/Restore Defaults”. This will enable all purchased options.
Make sure you have full administrator rights before starting the installation process, otherwise the drivers will not install correctly.
Retrieve Blaze V6.201 and drivers from the Larson Davis Website go to http://www.larsondavis.com/product-support/software/blaze and select the correct file for
your system either a 32 Bit or 64 Bit (see Below):
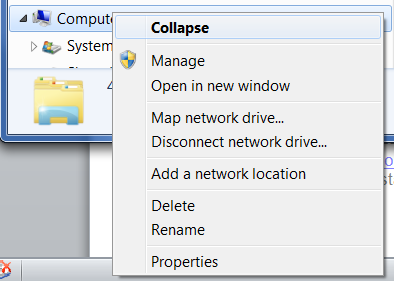
To find out what System type you have, click on the Start Menu, select Computer, then right click on Computer (right column) and select Properties or select ![]() . Look under System, to find what System Type you have and select the correct zip file. (Example below)
. Look under System, to find what System Type you have and select the correct zip file. (Example below)
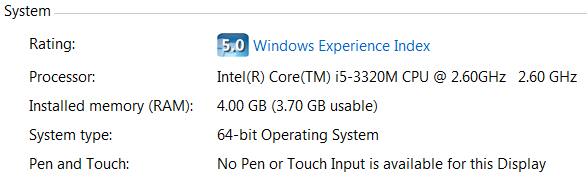
For the example above you would select ![]() for this computer. Click and Save As to your Desktop or where you would want the file stored.
for this computer. Click and Save As to your Desktop or where you would want the file stored.
You will find this icon on your Desktop.

All instrumentation that is connected to the computer must be disconnected prior to installing Blaze.
You must extract all files from the zip file before installing it. Click on the zip file folder
Then Click Extract All Files ![]()
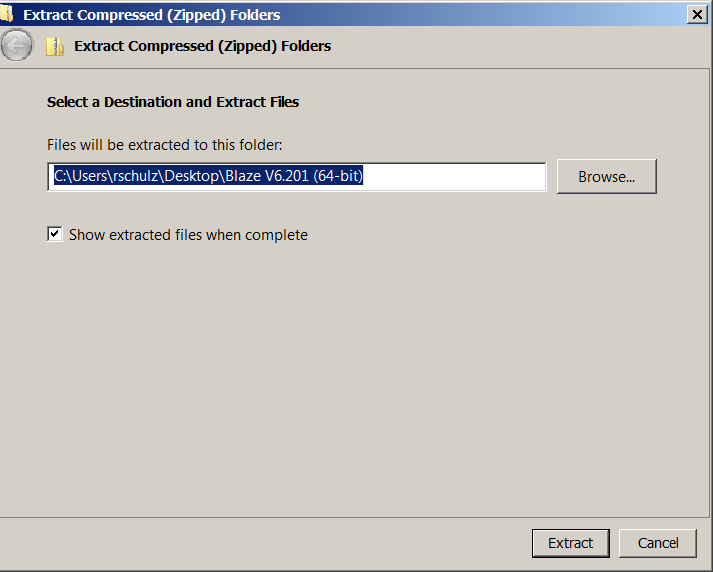
Once you extract the files, you will have these file options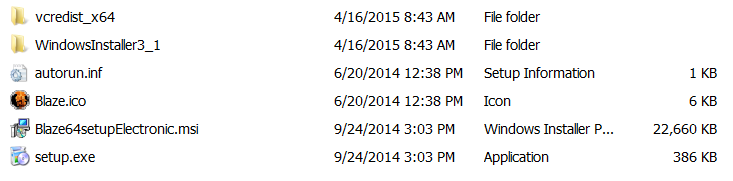
To install Blaze Software and drivers double click on the extracted setup.exe file (Application).![]()
NOTE: Do not select Windows Installer Package (see below) ![]()
Follow the prompts to install the program, and let it install in the default folder. Below are a few pop-up screens of interest as you go through the installation:
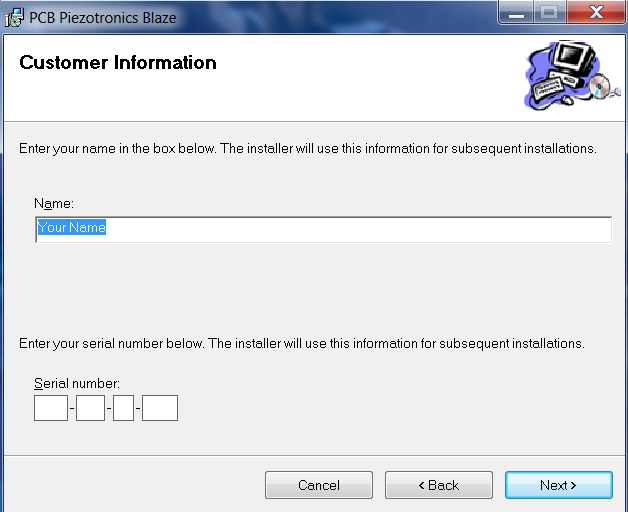
You will need a Serial Number– if you don’t have your serial number, please call Larson Davis Tech Support at 888-258-3222
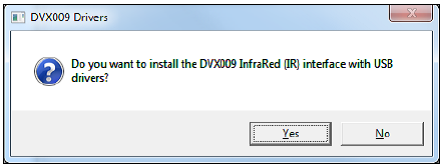
Infared Driver Interface Installation DVX009 and DVX010
Prompts to install DVX009 and DVX010 drivers, click Yes.
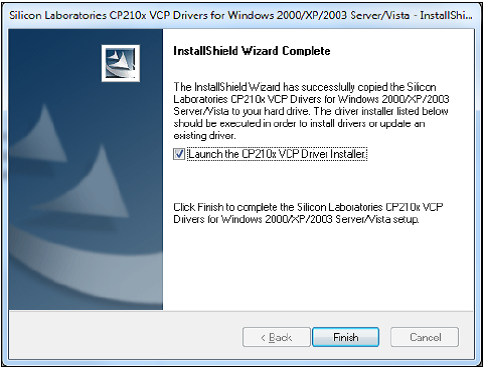
Software from Silicone Laboratories will appear, follow the prompts and continue through the installation process.

Follow prompts and don’t forget to check launch the CP210xVCP Driver Install
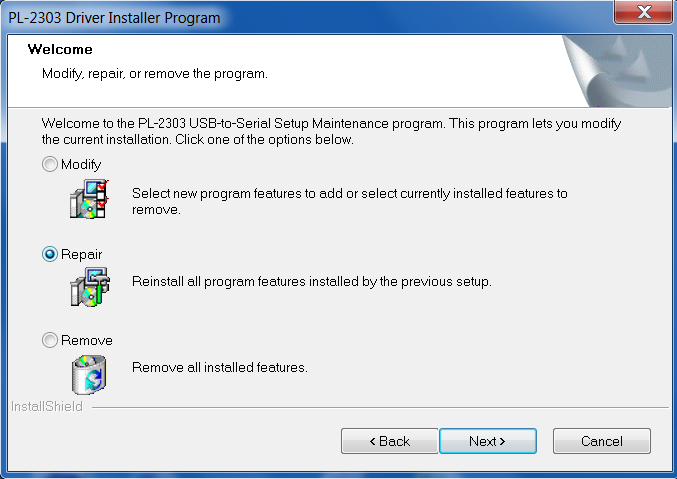
If this appears in the install, you may have had an Infrared (IR) device previously installed on your computer. Click option Repair then click on Next.
You may be asked to restart your computer DO NOT restart your computer when asked during the IR download. The Blaze install is still not completed. You can restart your computer manually after the Blaze install is completed.
After Blaze is installed, plug in the InfraRed (IR) interface (DVX009 or DVX010) into the USB port.
Allow the computer to automatically install the driver. (If a prompt appears and asks to have you let the computer search Windows Update for the driver, click CANCEL, this is a very long process and the Blaze software will automatically recognize the driver and install it).

Once the driver has been installed, it will show that the driver software has been installed successfully.

Remember what COM Port the device is specified at for when you open Blaze as you may need to specify the COM port your InfaRed (IR) devise is located at.
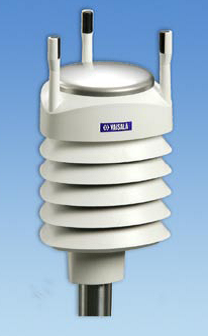
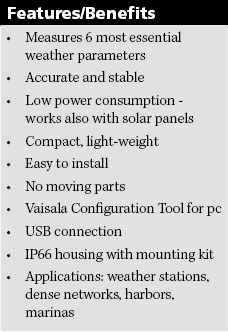
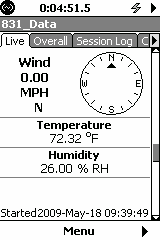
Model 831 V1.6 supports the Vaisala WXT520 weather transmitter
Next to the legacy models, we now introduce a combined weather sensor, SEN031, with ultrasonic wind sensor.
The picture and features / benefits come straight from the Vaisala brochure.
The CBL167 cable (20ft) goes from the WXT520 at one end to 3 connectors:
1) DB9 – WXT520 signal, serial port connects to DVX008A (powered hub is not required and can be connected directly to 831)
2) 831-INT Terminal block plug – WXT520 power (5-32V) connects to 831-INT Auxiliary Power port
3) DC Power cable socket – WXT520 heater (5-32V) connects to optional PSA027 power supply. If heater is not wanted to save power it can be left unconnected.
The 831-INT can’t deliver the 1.1A @ 12V = 13 W, hence the optional PSA027 power supply connection. We suggest configuring the heater only with AC powered systems.
The SEN031 mounts on TRP019 using the TRP008 and on TRP020 using the TRP021.
Typical configurations are:
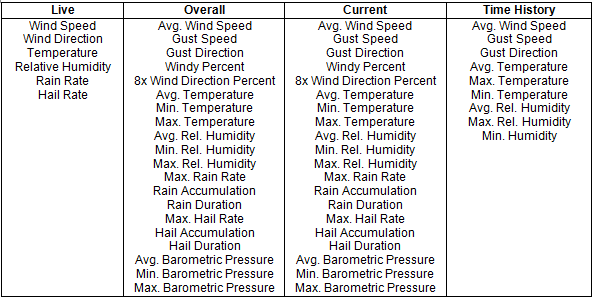
The table below shows which parameters are saved in the file, “Current” is saved in the Measurement History.
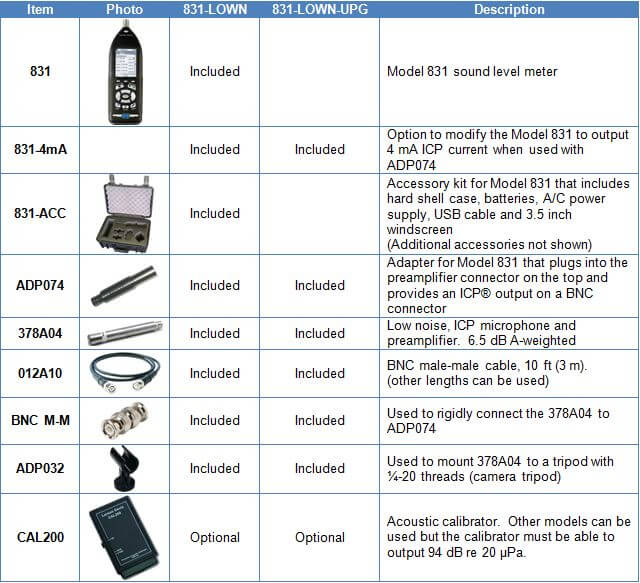
Larson Davis offers a comprehensive factory calibration for our products to ensure that your instruments continue to operate in compliance with published specifications
With CAL+ calibration our customers receive
A) Gather the model and serial number of the products to be calibrated
B) We will attach a sticker to the product(s) showing when the item was calibrated and when the next calibration is due. As part of our ISO 17025 accreditation, the equipment owner must tell us when the next calibration is due. Please specify the calibration due date in order to avoid delays while we ask for this information.
The due date can be a specific date or something like “in one year” or “in two years”. Larson Davis recommends factory calibration once per year.
C) Contact us at +1 716 684 0001 or sales@larsondavis.com to request an RMA number
D) Provide the following information
a. Model and serial number of items to be calibrated
b. The calibration due date
c. Return shipping address
d. Return shipping instructions (carrier and type such as overnight, ground, economy air, etc.)
e. Product owner name and address that will be printed on the calibration certificate if different from the organization ordering the calibration
E) Provide a purchase order (PO) or call to pay by credit card
Note: Expedited calibration is available for an additional cost. Please contact us for more information.
See the http://www.larsondavis.com/service/calibration.aspx for terms and conditions of CAL+ service
The Larson Davis Spark® Series multiple dosimeter system usually consists of the 706RC Dosimeter Remote Controller / Sound Level Meter and multiple 703+ or 705+ Personal Noise Dosimeters. NOTE: For the duration of the troubleshooting guide, the text, to avoid duplication, will only refer to the 705+; however the 703+ functions are identical to that of the 705+ and all recommended suggestions apply.
The 706RC has an LCD Display and a keypad for controlling and reading out data from the 705+. Use of these devices to obtain and report worker noise exposure data is usually straightforward and relatively simple, however, as with any system, unusual circumstances may result in actual or perceived fault conditions. The purpose of this document is to help guide you though any anomalous conditions or behaviors which may prevent the proper calibration and use of the system in the field.
706RC 705+ 703+
The units shown above work together to form a dosimetry system whereby the 705+ personal dosimeter is able to be calibrated, controlled, and viewed by the 706RC remote control unit. This offers the utmost in reliable operation and good sampling results as the subject under test has no controls or display on the dosimeter with which to interfere, nor any visual indication of data to try to influence the results. It also allows the instrument operator to stand a comfortable distance away from the worker while starting / stopping the data gathering, viewing and verifying data, logging status, battery capacity, etc. throughout the day. It is also possible to use the 706RC independently as a simple Sound Level Meter with an optional rigid microphone assembly (MPR002)
Five possible types of failure are covered in this Troubleshooting Guide:
Glossary of Terms used in this Guide:
FOR THE 705+ DOSIMETER:
Sleep Mode: Unit is powered (battery is installed) but unit is not measuring or taking data. This is indicated by a single LED blink every five seconds. The dosimeter is using very little power in this mode and may be shipped / stored while in sleep mode. When a 706RC is present and sending the ‘connect’ signal to the 705+, it will come out of the sleep mode
Power Up Mode: Unit is being powered after having the battery removed for an extended period of time. This is indicated by a simultaneous illumination of both the green status LED and the red power LED. This mode may last from 1 to several seconds depending on the amount of memory which is already being utilized for data storage in the dosimeter.
Awake Mode: Unit has been awakened by the ‘connect’ command issued by the 706RC and is ready for calibration, measurement and calculation of data values.
Connect Mode: Unit is being awakened by the 706RC. This is indicated by a simultaneous illumination of both the green status LED and the red power LED. This mode may last from 1 to several seconds depending on the amount of memory which is already being utilized for data storage in the dosimeter
Running Mode: Unit is measuring noise dose and taking data. Indicated by a fast blink of the green ‘status’ LED
Power Critical Mode: Unit has virtually no battery capacity remaining and cannot perform any function. This is indicated by a single illumination of the red power LED every ten seconds.
FOR THE 706RC REMOTE CONTROL UNIT:
Envelope Icon: Indicates the 706RC is communicating with, controlling and receiving information from the 705+. All information viewed on the 706RC display is coming from the 705+ dosimeter while the envelope display is flashing.
Check Key: The check key is located in the very center of the 706RC keypad and behaves very much like the ‘Enter’ key on your computer. Also, use the check key to acknowledge any message on the display screen which says “OK”
Reset Key: is located in the lower left hand corner of the 706RC keypad; it is used for clearing the overall test results from the display screen. It also behaves like the ‘Esc’ key on your computer, and is a means for reversing to previous menus or display screens
Possible individual faults preventing proper field sampling operations:
1. Unit does not turn on:
Model(s) affected: 706RC
Indicated by: no response when on button is pressed (706RC) no LED has illuminated over a more than 10 second period (705+)
Probable cause: Batteries ‘dead’ or not installed
Recommended fix: Replace Batteries w/ 2 each AA Alkaline cells, by loosening the latch at the top of the battery door and lifting off the cover. Be sure to observe the battery polarity (+ and -) markings in the battery compartment as installing the batteries incorrectly will cause the unit to fail and no longer be operable. If the new batteries do not fix the problem, (and they are known good batteries) then the unit will need to be returned for repair. (Note: do not replace batteries in a Hazardous Location as defined by NFPA code)
2. Unit does not turn on:
Model(s) affected: 705+
Indicated by: No LED has been observed to illuminate over a more than 10 second period (705+)
Probable cause: Battery ‘dead’ or not installed (Note: 703+ uses 2 ea. AA cells)
Recommended fix: Replace Battery w/ 1 each AA Alkaline cell by loosening the screws on the battery cover. Be sure to observe the battery polarity (+ and -) markings in the battery compartment as installing the battery incorrectly will cause the unit to fail and no longer be operable. If the new battery does not fix the problem, (and it is a known good battery) then the unit will need to be returned for repair. (Note: do not replace batteries in a Hazardous Location as defined by NFPA code)
3. Unit (705+) does not connect to 706RC within a few seconds
Model(s) affected: 705+ and 706RC operating together
Indicated by: Display of 706RC reads: “Searching for Any 70x” or “Searching for Serial number 41nnn” (n=some number)
Probable cause: a. Infrared ports are not aligned properly or 706RC is too close or too far away from the 705+ (optimal distance is 1-3 feet) b. battery (ies) are too low in either 705+ (most probable) or 706RC (less probable) to transmit IR signal c. there is interference with other 705+ dosimeters in close proximity d. there is interference with other IR sources or reflection of the IR beam
Recommended fix: a. Try moving the units closer to or farther away from each other. b. replace batteries c. physically relocate other dosimeters, turn them away from the 706RC, place in storage case, etc. d. eliminate other IR sources or shield the 706RC and 705+ from the direct effect of other IR sources. If the units are resting on a highly polished table or a sheet of white paper, reflections from the surface may affect connection or even cause the units to ‘freeze’
4. Unit does not allow Calibration:
Model(s) affected: 705+ Dosimeter
Indicated by: Displayed error message: “Must ▼RESET First OK” (see Fig.1)
Probable cause: Dosimeter must be reset before Calibration can take place
Recommended fix: Press ‘Check’ key to erase error message, then press reset key three times until you see “▼ Reset Overall? YES NO” Press Check key once, then ‘tools’ key to return to Calibrate screen. Proceed with Calibration as normal. NOTE: If dosimeter does not respond or appears to be reset, yet will still not allow Calibration, see 7. below
5. Unit does not allow Calibration:
Model(s) affected: 705+ Dosimeter
Indicated by: Displayed error: “Must ► STOP and ▼RESET First OK”
Probable cause: Dosimeter must be stopped (from taking data) and reset before Calibration can take place.
Recommended fix: Press ‘Check’ key to erase error message, then press RUN key once, then press RESET key three times until you see “▼ Reset Overall? YES NO” Press Check key once, then press the TOOLS key to return to Calibrate screen. Proceed with Calibration as normal.
6. Unit does not Calibrate / Calibration fails:
Model(s) affected: 705+ Dosimeter
Indicated by: ! in upper left hand corner of display on calibrate screen when connected to the 706RC. (This will also be seen in the lower part of the display accompanied by the word “LOW”. See 4. for normal Calibration process)
Probable cause: a. Calibrator is not turned on, b. microphone is not placed in the opening of the calibrator, c. calibrator output is incorrectly selected, or d. microphone not connected or is malfunctioning.
Recommended fix: a. Press round ‘ON’ button on side of CAL150 calibrator to turn it on. (see Fig 2). Note: calibrator will turn itself off after 90 seconds in order to save battery power. If calibrating multiple dosimeters, it may be necessary to press the on button again) b. Make sure the microphone is firmly placed into the opening if the calibrator adapter; there is an “O-ring” seal in the inner diameter of the calibrator adapter and this may require firm force to seat the microphone all the way into the adapter opening. c. There is a miniature slide switch on the calibrator housing (the same side of the case as the ON button). Make sure this ‘dB Level’ switch is in the “114 dB” position (pushed all the way towards the end of the calibrator which has the microphone opening. d. Make sure the silver microphone connector is fully seated in the mating receptacle in the top of the dosimeter. If it is fully connected and still indicating ! or ! LOW on the calibration screen, then the microphone is most likely defective and should not be used. To verify this, take a different microphone and substitute it for the malfunctioning and proceed with calibration procedure. If the calibration is successful then it is the first microphone which is at fault.
7. Unit appears ‘frozen’ and does not respond to commands
Model(s) affected: 705+ Dosimeter
Indicated by: Display prompt on 706RC is asking the operator to “first Stop and Reset” even though 705+ dosimeter is not running / no data are present.
Probable Cause: Unit has had some interference and/or interruption of infrared control most likely caused by having multiple dosimeters in close proximity to each other while attempting communication or control by the 706RC.
Recommended fix: Remove the battery from the dosimeter and set it aside for at least five minutes, then replace the battery and observe the dosimeter as it indicates it is going through the Power Up mode (see Glossary). This action will perform a complete system reset of the dosimeter – NOTE: you must check the date and time and reset it if has been changed back to the default settings (1/1/08 and 00:00:00) due to loss of power.
8. Battery Capacity insufficient for full shift monitoring:
Model(s) affected: 705+ Dosimeter
Indicated by: trouble connecting; sluggish response, Red battery indicator LED is illuminating once or twice every three seconds; red LED is illuminating once every ten seconds; no LED has illuminated over more than a 10 second period
Probable cause: Battery almost ‘dead’ or ‘dead’
Recommended fix: Replace the battery with a known good battery. (Note: do not replace batteries in a Hazardous Location as defined by NFPA code)
9. Unit does not display correct date or time:
Model(s) affected: 705+ Dosimeter
Indicated by: displays incorrect date and time
Probable Cause: battery is ‘dead’ or has been removed from dosimeter for a period of time
Recommended fix: Reprogram correct date and time by using 706RC to enter correct date and time manually or connect 705+ dosimeter to the PC using Blaze software. (Once connected, the Blaze s/w will automatically synchronize the date and time to the settings of the PC)
10. Unit displays ‘Mic Fault’
Model(s) affected: 705+ Dosimeter and 706RC
Indicated by: displayed error message: “MIC FAULT OK”
Probable Cause: a. microphone is not connected b. microphone was unplugged by the worker during the test and plugged back in c. microphone is malfunctioning
Recommended fix: a. plug in microphone, press ‘Check’ key to erase error message. (Note: alarm bell indicator will remain on the display to let you know this unit had experienced a mic fault) b. press ‘Check’ key to erase error message. c. substitute a different microphone and recalibrate before further use
Illustrations referred to in this Guide:
Fig. 1: “Must ▼RESET” message FIG. 2: Calibtrator Controls
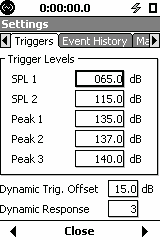
When setting up the 831 to log exceedances, you need to specify a trigger method:
- LEVEL – this is straightforward, simply the level at which an event is triggered.
The trigger is defined at the first level reached of RMS (SPL 1) and peak (Peak 1) value.
- DYNAMIC – unique feature of Model 831.
Why choose Dynamic?
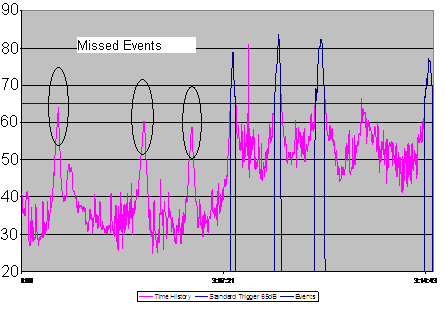
Imagine the neighbor’s dog barking during the day. Because of the amount of background noise (cars driving by, people mowing their lawn, kids playing in the yard) this would not be considered a significant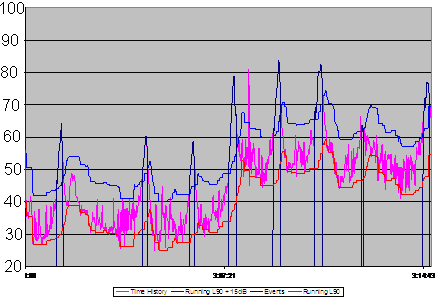
noise event. However, if that same dog were barking
at midnight, it would be annoyance.
Since the dog hasn’t gotten any louder, applying the same level trigger for the entire 24-hour measurement would not yield useful data. The plot above right shows a standard trigger situation. As you can see, some events were missed due to being below the trigger level.
This is where the dynamic trigger comes in handy. By tracking the background noise level or L90 (level exceeded 90% of the time, shown in red) and adding an offset to it (15 dB offset shown in blue) we can determine better when an event occurs. A very useful feature for unattended monitoring applications.
Dynamic Trigger Setup
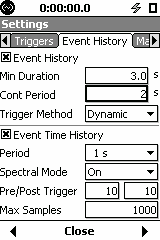
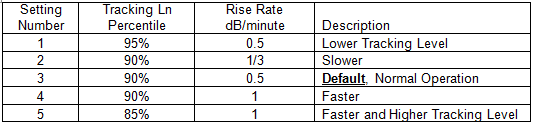
Dynamic Response Setting Number
To select the setting number, start by using the default setting (3). If you find that you’re missing events because the trigger level went up too much during an event, then make it slower and see if triggering is improved. If you find that you’re getting false events because the background levels are changing too fast, then make it faster so that the 831 is more responsive to changes in background level.
CBL170 Auxiliary Connection cable
Cable connecting the Model 831 sound level meter to serial connector and coaxial DC connector (to PSA027). Serial connector: wind speed and direction, logic I/O, 2 slow ADC.
The CBL170 consists of 3 parts:
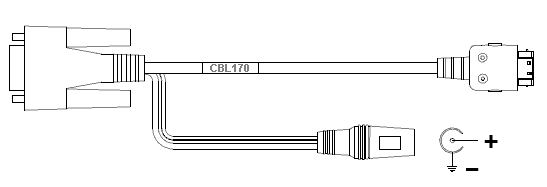

The high density connector (Hirose 18-pin) goes into the Model 831.
The power is supplied via the coaxial DC connector (2.5 mm), eg with PSA027.
Female DB9 provide the following signals:
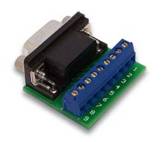
The cable with male DB9 and pigtails and male DB9 breakout board with screw terminals are there for convenience.
Use examples:
=> Logic Out – Connect to relay with alarm light
=> Wind speed – as tach input (1 reading / second)
=> Wind speed / direction
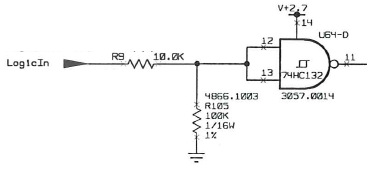
Using Logic In:
The logic-in is not latching and is sampled by the microprocessor so for the trigger to be reliably detected, the pulse needs to remain high until sampled; at least 100ms.
The Model 831 includes the circuitry below for signal conditioning:
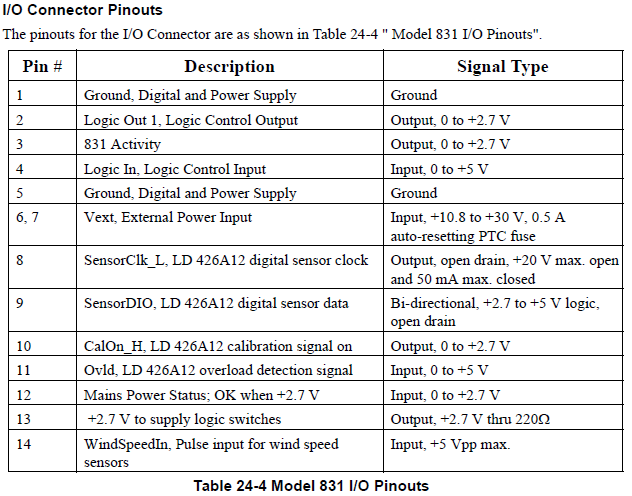
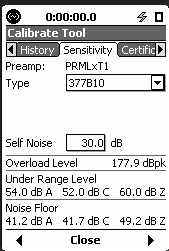
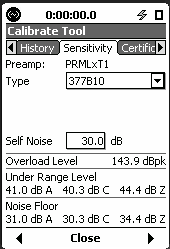
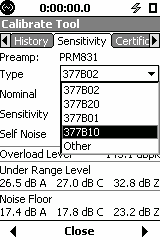
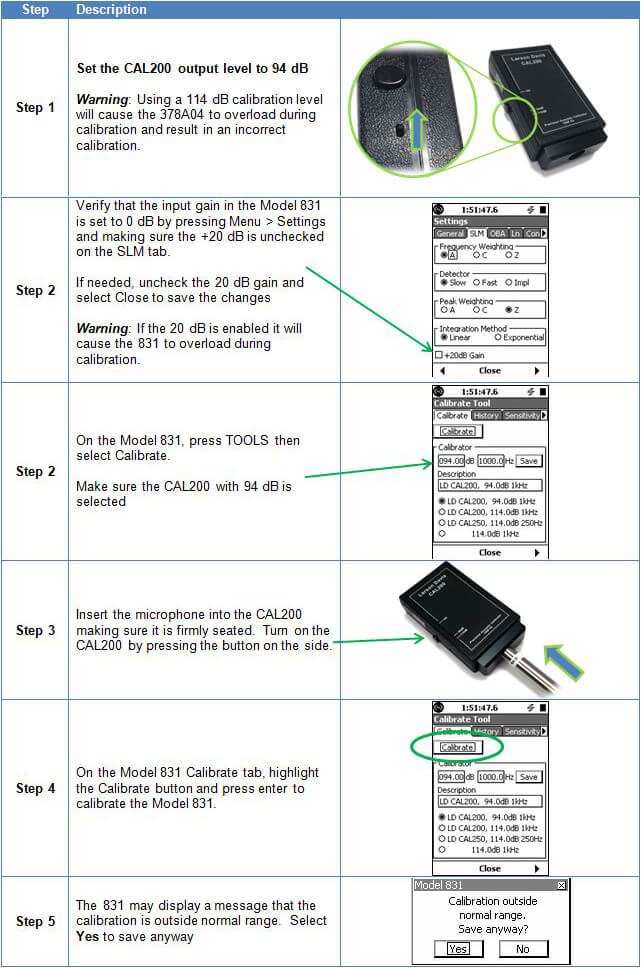
When using the SoundTrack LxT or Model 831 with a ¼” pressure microphone (377B10) you also need a ½” to ¼” adaptor for the preamplifier (ADP043) and another one for the CAL200 calibrator (ADP109).
Note: Part numbers and firmware revisions are subject to change. Please contact Larson Davis for current part numbers and firmware revisions.
The recommended preamplifiers are the PRMLXT1 for the LxT and the PRM831 for the 831.
The TOOLS – CALIBRATION section has different screens: Calibrate, History, Sensitivity, Certification and (in the 831 only) an E.A. Check screen and an E.A. History screen. In the sensitivity screen you select the 377B10. After calibration you will see the screens as shown on the LxT (left) and the 831 (right).
 New Peak Level shown ( 177.9 dBpk)
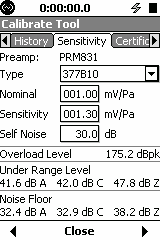
The peak overload level is the maximum level at the preamplifier that will produce an electrical overload. This level may exceed the maximum sound pressure level the chosen microphone is capable of measuring. Please consult the microphone data sheet for the maximum level for your microphone.
The sequence below shows how to move from the ½” microphone to the ¼” microphone, during the calibration. Sequence of screens (LxT) when changing from ½” free-field microphone (377B02) to a ¼” pressure microphone (377B10).

Sequence of screens (831) when changing from ½” free-field microphone (377B02) to a ¼” pressure microphone (377B10)

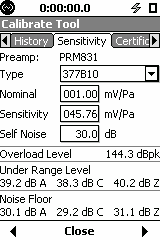
The Calibration outside normal range message may or may not appear depending on the nominal sensitivity (user selectable in the 831). Refer to the manual where the valid range is shown. This warning is intended and allows to detect a larger than normal change. There is no problem in accepting the change. (If you recalibrate with a 50mV/Pa microphone, your reference will be again the old one).
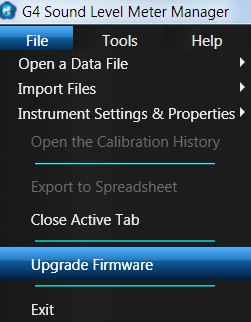
Please follow the instructions below to upgrade firmware and/or options on Model 831, SoundTrack LXT® or SoundExpert LXT.
Updating to the latest version of SLM Utility-G4 PC-Software
1. Go to http://www.larsondavis.com/support/soundlevelmetersupport/Model831.aspx
for the Model 831 or http://www.larsondavis.com/Support/SoundLevelMeterSupport/LxTSoundLevelMeters for the SoundTrack LXT® or SoundExpert LXT and download the most recent version of SLM Utility-G4.
Download the G4_Installer_x64.exe for a 64 bit operating system, or G4_Installer x32.exe for a 32 bit operating system (to check to see what operating system you have, go to Start, Control Panel, System).
Note: Make sure you have full admin rights before starting the installation process, otherwise the drivers will not install correctly.
2. Download and save the file to your computer.
Note: If the path to the file is longer than 128 characters the Windows operating system may generate an error. You will have to move the zip file to a location with a shorter path name.
3. Disconnect any Model 831 or LxT that is connected to the PC.
4. After the file is saved, find the zip folder (on the location you chose on step 2) and right click to select “Extract All”. After the file is extracted run the installer file.
5. Follow the wizard instructions to install SLM Utility-G4 on your PC.
6. Upon completion of the install, you will see the SLM Utility-G4 shortcut on your desktop.
Connecting the meter to the computer
Updating firmware rev. in Model 831, SoundTrack or LXT SoundExpert LXT® using SLM Utility-G4
 lost. Using SLM Utility-G4, save any data or setups you have in the meter before upgrading.
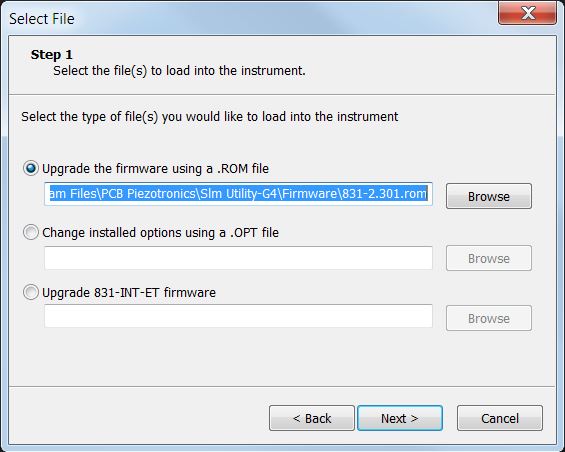 firmware file is selected and ensure that “Upgrade the firmware using a .ROM file” is selected.
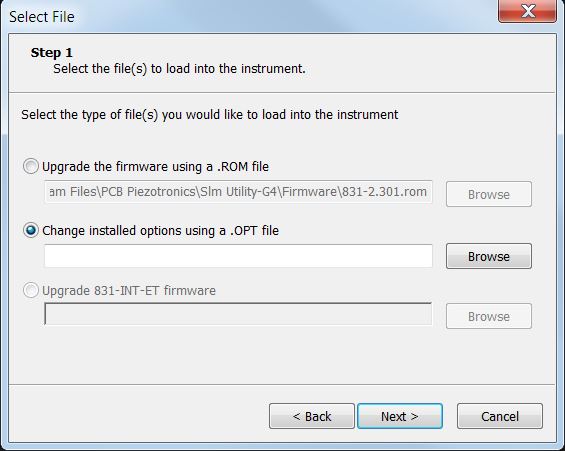
Installing new firmware options in Model 831 and SoundTrack LXT® using SLM Utility-G
NOTE: An options file is linked to the serial number of an instrument and is typically emailed to you after order placement, Make sure the meters serial number and .OPT file serial number match before continuing.
Troubleshooting
SLM Utility-G4 cannot find my sound level meter because the sound level meter will not fully boot. If your sound level meter will not fully boot try the following step
The Model 831 sound level meter can be powered several different ways including
A) Internal AA batteries
B) USB
C) External 12V DC supply
The Model 831 includes many input power protections to help avoid damaging the instrument.
Input Power Protections
A) When using internal AA batteries – The Model 831 is protected from reverse polarity and includes a 0.75 ampere fuse in the positive supply
B) When using USB current limit protection is provided by the USB port supplying power, i.e. PC, hub or PSA029.
C) When using the 12V DC input – There is a 0.5 ampere fuse in the positive supply and reverse polarity protection
Grounding
The Model 831 ground or negative supply is available in multiple locations and can be found at:
Internal to the Model 831 all grounds are electrically connected and there are no fuses or other protection against externally induced ground current. It is therefore important that all 831 ground points remain at the same voltage. Failure to keep the ground voltage consistent can result in electrical currents that can permanently damage the Model 831.
A voltage differential can be created by a variety of situations and listed below are a few.
1) The exterior of the preamplifier, microphone or cable connector comes in contact with an unprotected power supply such as the positive terminal of a battery.
2) The shield of a USB cable that is connected to the 831 comes in contact with an unprotected external power supply.
How to Protect Against Destructive Short Circuits
A) Make sure all power connections are covered by an electrically insulating material. This includes the terminals of any external 12V batteries which should have terminal covers securely installed that cover all conductive portions of the terminal and connector.
B) Disconnect power when servicing the Model 831 or system components by disconnecting the negative wire from any external batteries
C) Use a 4 ampere fast blow fuse in both the positive and negative terminals of any external power cables.
D) When shipping, use the following precautions
a. Ship systems without the battery installed to prevent possible short circuiting while in transit
b. Alternatively, disconnect and secure the negative wire during transit
c. Review and follow instructions provided by the shipper for shipping batteries
d. Review and follow and instructions specific for the system being shipped
E) Store cables securely to avoid accidental movement and an inadvertent short circuit
Sierra Wireless LS300 Description
The Sierra Wireless LS300 is a new model wireless gateway designed to replace the Raven product line and 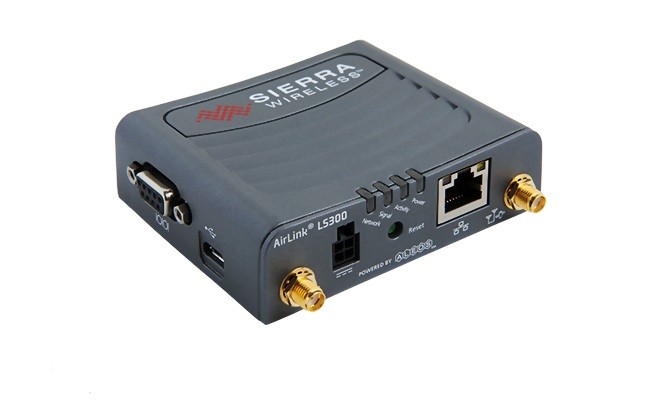 support 4G data.
The LS300 is used inside the NoiseTutor system to provide a wireless data connection and SMS messaging. For data service the factory default settings are typically adequate although for SMS messaging to work, some configuration of the LS300 is necessary.
Required Items
Configuring the LS300
The LS300 has a built-in web page called AceManager that is used to configure the device and detailed instructions for accessing and using AceManager are included in the LS300 User Manual. This document provides an overview of the necessary steps.
1) Connect a PC (typically the NoiseTutor PC) to the LS300 using a CAT5 cable and power on the LS300
2) Open a web browser and enter http://192.168.13.31:9191 in the address bar and the login screen should appear. If you don’t see the login screen, reboot the PC and repeat this step.
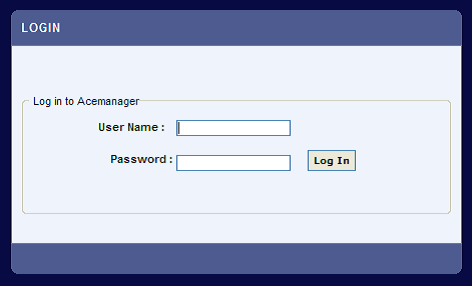
3) The default administrator user name is user and the default password is 12345
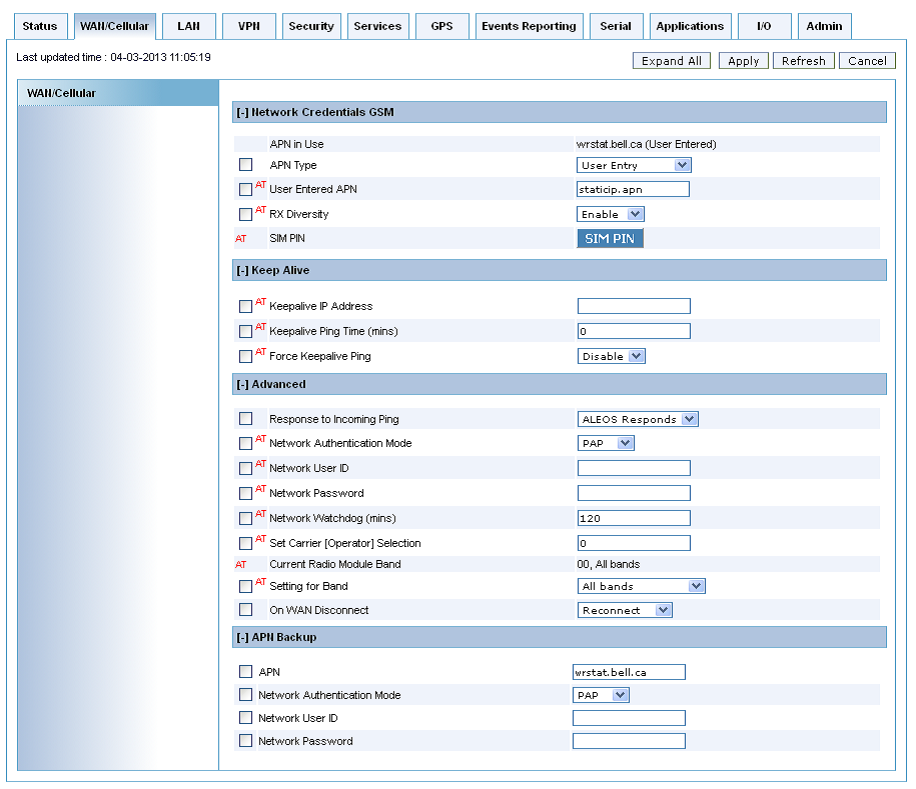
4) Most cellular service providers require an Access Point Name, APN, be configured for the system to work properly. When an APN is needed but not entered, they LS300 will not be able to access the internet.
a. Acquire the APN name from your cellular service provider
b. On the top tab, select WAN/Cellular
c. In the box titled APN enter the APN name from your CSP
d. Continue to step 5 or select Apply and Reboot if SMS messaging is not being configured
e. When the APN is correctly set and cellular service is available, the LS300 will be able to acquire an IP address
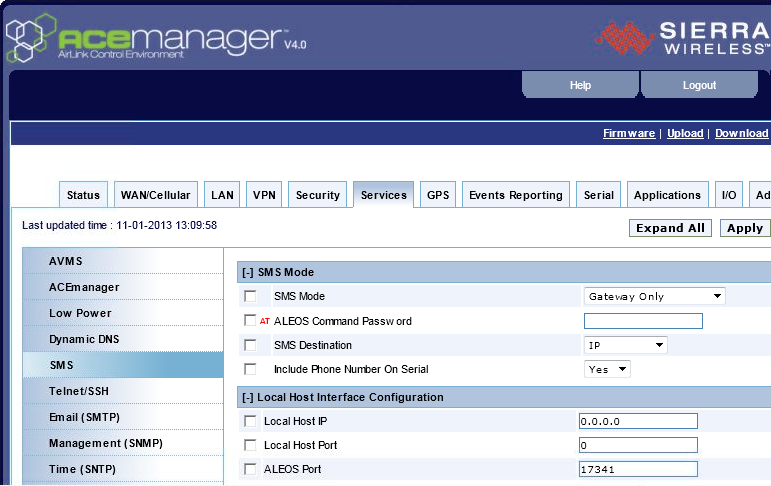
5) On the top tabs, select Services then on the vertical tabs select SMS
6) In the drop down titled SMS Mode select Gateway Only
7) In the field titled ALEOS Port enter then number 17341
8) Select Apply and then Reboot
The LS300 is now configured to send SMS messages using UDP port 17341
Configuring NoiseTutor to Send SMS using the LS300
1) In the NoiseTutor software, select Setup > Messaging > SMS to open the SMS setup dialog
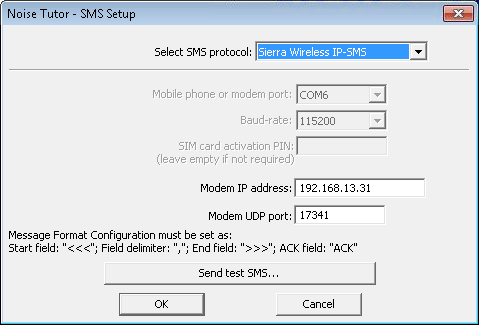
2) On the dropdown titled Select SMS protocol select Sierra Wireless IP-SMS
3) In the field titled Modem IP address enter the default IP address of the LS300 which is 192.168.13.31
4) In the field titled Modem UDP port enter the number 17341
5) Use the button Send test SMS… to verify that an SMS message can be sent then click OK
6) NoiseTutor is now configured to send SMS messages. Go to Setup > Event Detection > Event to configure an SMS message when an event has occurred.
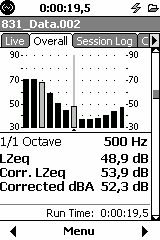
QC Tonality
In the OVERALL tab, the QC Tonality screen will appear after the 1/1 octave screen if:
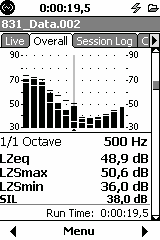
1/1 Octave in OVERALL QC Tonality Options Display
The QC Tonality algorithm proceeds as follows:
In the example displayed above there are two bands with a correction, 31.5 Hz and 500 Hz, which are both greyed out.
Note for the 31.5 Hz it only looks at the 63 Hz band and not at the 16 Hz since it is outside of the analysis band.
This document contains instructions on how to establish a Hyper-Terminal connection (serial port) with the HVM100. If you have already established this connection, skip to the command instructions sent with your serial number specific options.
A. Turn on the HVM100 and set its baud rate to 115.2k. Connect the CBL006 cable to the HVM100's serial connector and to the PC's Com1 serial port.
B. Use Window's Hyper-Terminal to establish connection to the HVM100. Hyper-Terminal is found in Windows by selecting "Start", then "Programs", then "Accessories", then "Communications", and then "Hyper-Terminal".
C. Once Hyper-Terminal starts, you will be asked to "Enter a name and choose an icon for the connection:". Type "HVM100" for the name, and select one of the available icons. Then press OK. See Figure 1 below.
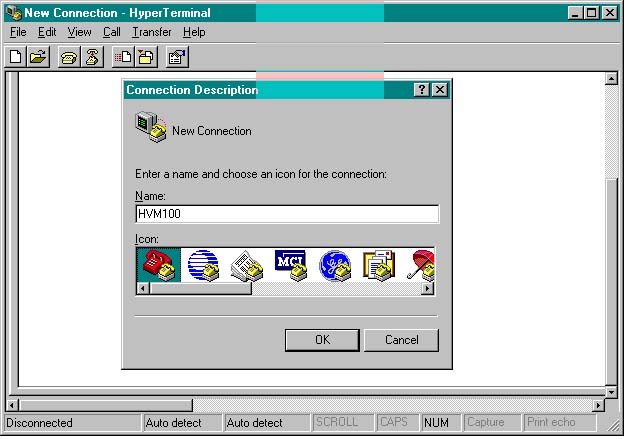
Figure 1: Type HVM100, select and icon, and press OK.
D. Hyper-Terminal will then open a window titled "Connect To". In this window select "Connect using: Direct to Com1", and then press OK. See Figure 2 below.

Figure 2: Select “Direct to Com1” and press OK.
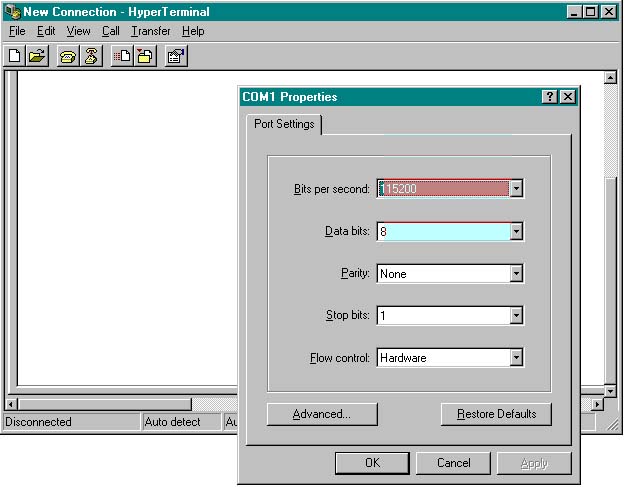
E. Hyper-Terminal will then open a "COM1 Properties" window. Setup Hyper-Terminal as shown in Figure 3 below and then press OK.
F. Next, from the main menu in Hyper-Terminal, select "File" and then "Properties". A window titled "HVM100 Properties" will appear. Select the Settings tab. See Figure 4 below.
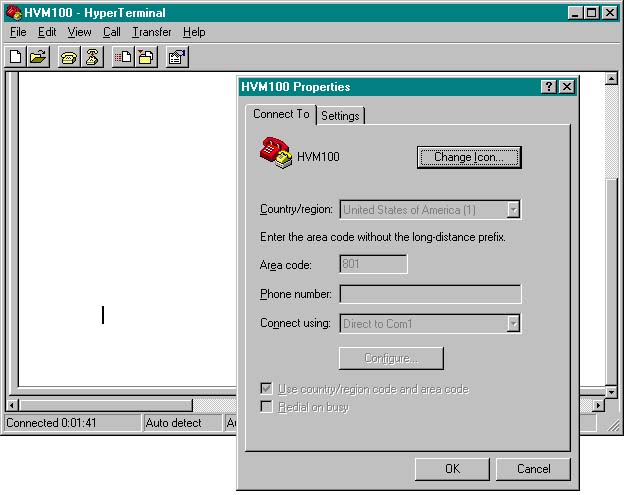
Figure 4: Select the “Settings” tab .
G. After the “Settings” window appears, select the “ASCII Setup…” tab. See Figure 5 below.
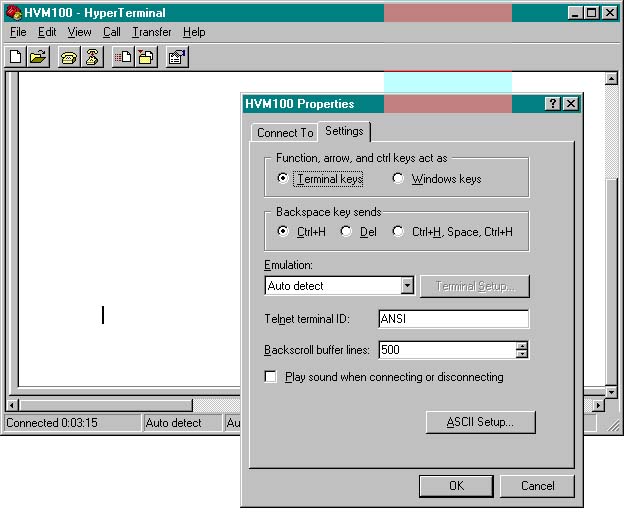
Figure 5: Select the “ASCII Setup…” button.
H. After the “ASCII Setup” window appears, select the “Send line ends with line feeds” and “Echo typed characters locally” options. See Figure 6 below. Then press OK and then OK again to close both windows.
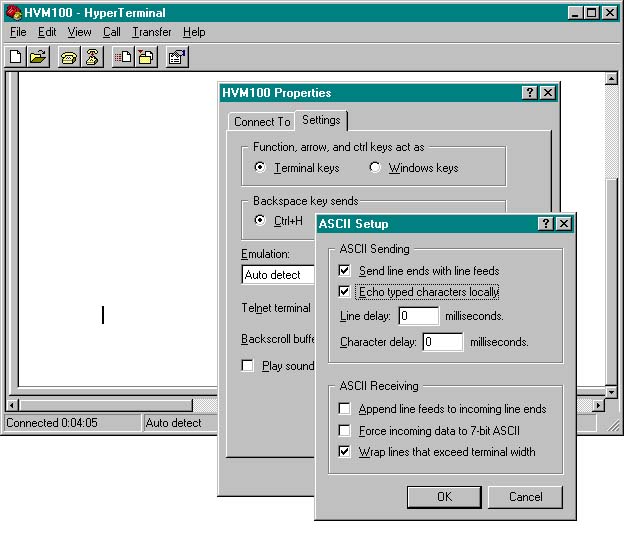
Figure 6: Configure ASCII Setup as shown. Press OK (press OK again to close previous window).
Once you have connected to the meter, type the commands given to you by Larson Davis to update you meter.
Communication Watchdog Overview
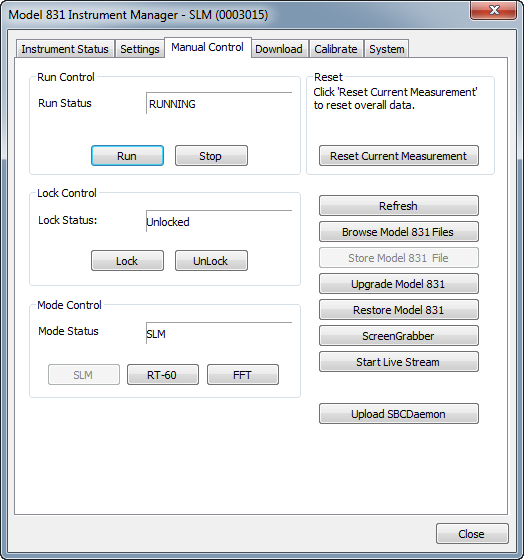
The Model 831 and 831-INT-ET have features to monitor the USB communication between the two devices and if there is no communication for one hour, the Model 831 and 831-INT-ET will automatically power cycle.
Requirements for this feature 
Communication Watchdog Description 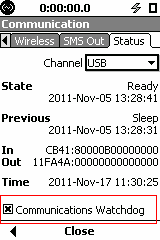
When an 831 matching the requirements above is placed into an 831-INT-ET, the 831-INT-ET automatically sends a command to the 831 that enables the communication watchdog. When an 831 is removed from the 831-INT-ET, the communication watchdog remains enabled but becomes inactive. To disable the watchdog, go to Tools -> Communication -> Status and uncheck Communications Watchdog at the bottom.
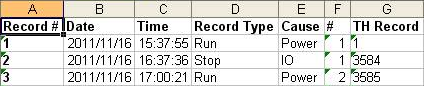
If the communications watchdog triggers a power cycle, the system will turn completely off and in approximately 1-2 minutes turn back on. A communications watchdog event produces records in the 831 Session log that show a stop due to IO and a run approximate 1-2 minutes later.
WARNING: The 831 does not differentiate between an 831-INT and 831-INT-ET. If an 831 has been placed in an 831-INT-ET and then later removed and placed in an 831-INT, the communication watchdog must be manually disabled. Failure to do this will cause the 831 to turn off after one hour.
For additional information, see 831 Manual page 12-24.

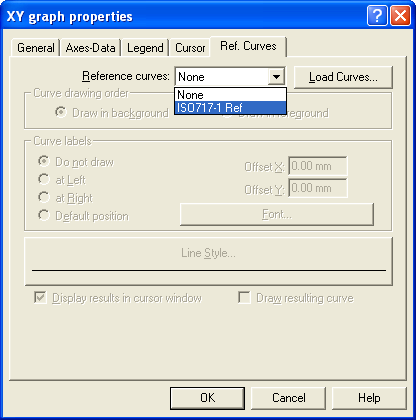
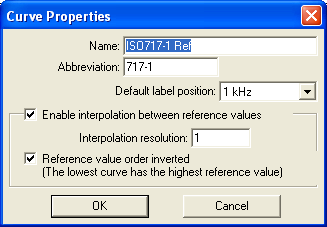
DNA Reference Curve Editor
There are numerous examples of references curves, yet the most popular one is probably the 
equal loudness curves, see below.
DNA stores the reference curves in the DNA4/Weight directory as “CRW” files.

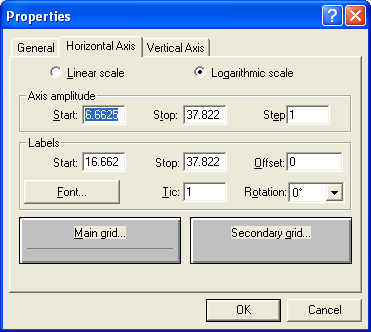
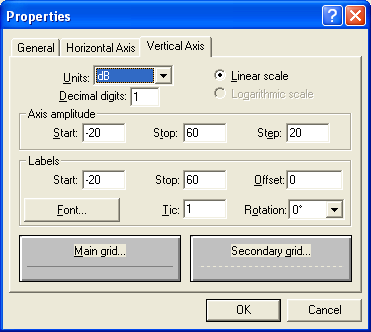
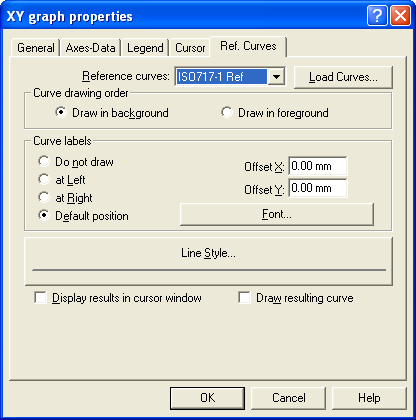
The files are defined using the Reference Curve editor from DNA (DNA4/RefCrv.exe) and placed on the graphs using the “Ref Curve” tab of the graph properties.
Working principle of Reference Curve:
ICONS
Selection Icons 
Curve Icons 
When you want to delete for example a point of 100 Hz for all curves, use the combination with the X-selection as shown below:
Graph icons 
MENU
The standard MS Windows commands or those already mentioned as icons are not discussed here.
Edit Menu

Tools Menu
View Menu
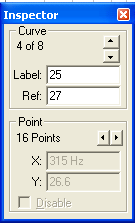
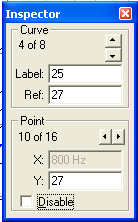
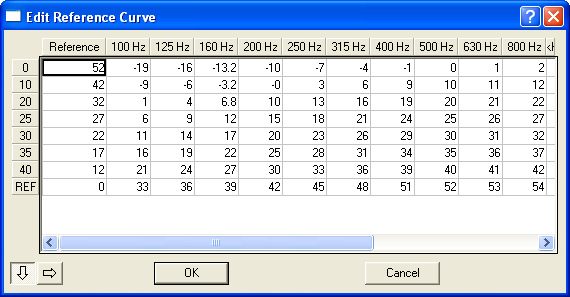
This allows you to enter the Label (make sure to press ENTER or the value is not registered) and the Ref value.
If you click on a point on the graph or on the frequency arrows you will see the right screen. This does not allow you to change the values.
About the reference, you need to have all the values either in increasing order (top to bottom) or in decreasing order (reverse).
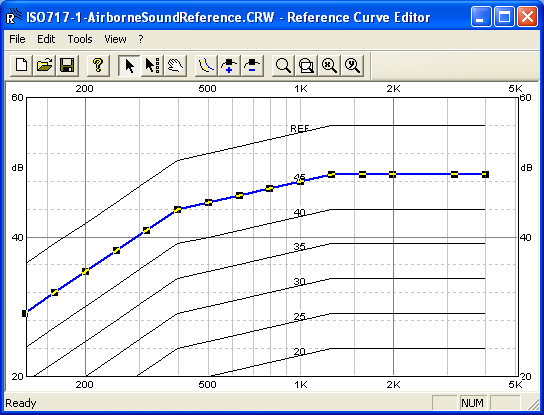
Example
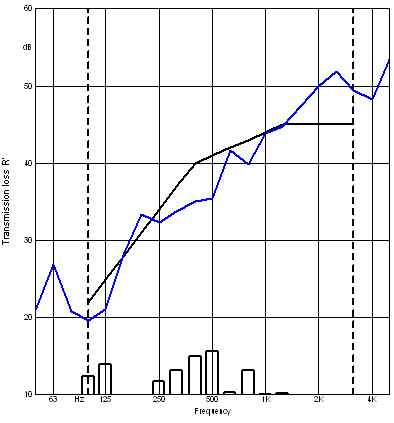
The graph on the left has no reference curve, while the one below has the reference curve added.
Required equipment:
1. In order to avoid conflict with existing other networks, please ensure the wireless LAN on your PC is DISABLED.
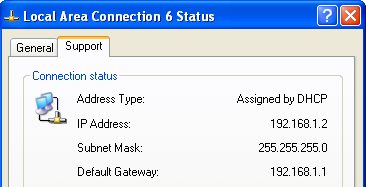
2. Boot up the router connecting your PC using a CAT5E cable using port 1 of the router. Check with the standard tools to find the IP address. In the display below you will recognize:
a) Default Gateway: 192.168.1.1
b) IP Address (of your PC): 192.168.1.2
3. Prepare the 831-INT-ET with 831
a) Place the 831 in the 831-INT-ET cradle and secure with the screw.
b) Connect the 831 USB cable to the 831-INT-ET “USB B” port.
c) Connect the LAN cable from the 831-INT-ET “Ethernet” port to port 2 on the router.
d) Power up the 831-INT-ET
e) Wait about 3 minutes to be sure that the 831-INT-ET is booted, has started a communication with the router and with the 831.
4. Start SLM-Utility-G3 V2.110 or later
a) Go to “Connection” » Remote » Internet and enter the next available IP address (in this case 192.168.1.3)
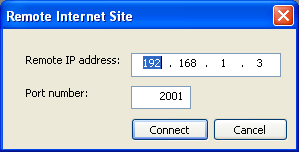
b) Click “Connect”
The SLM Uitlity-G3 program will quickly locate the 831 because of the shortness of the cables.
c) You will see a screen like this:
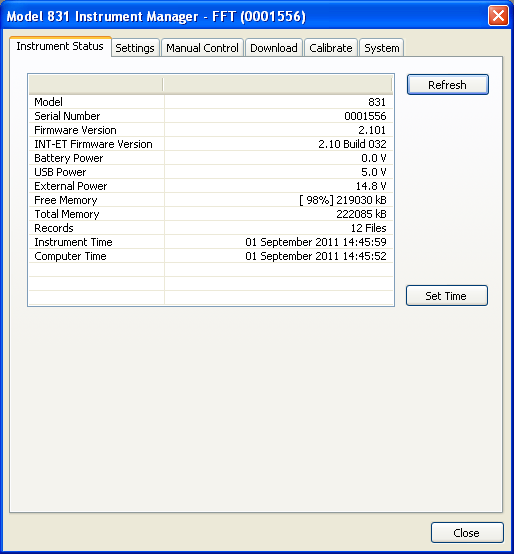
d) You are connected to the Model 831 via the Model 831-INT-ET Docking Station and the router.
Connection Photo
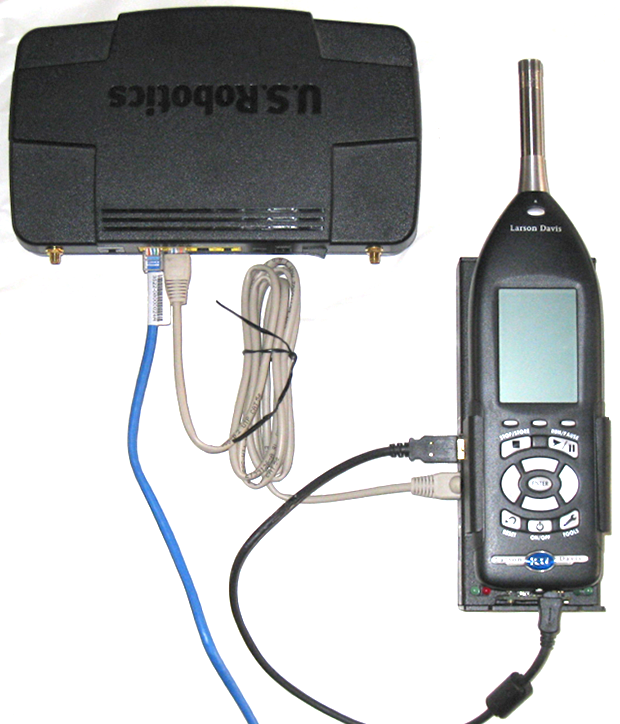
The AC adapters are not shown.
The BLUE CAT5 cable goes to the PC (PC not shown).
The USB cable between 831 and 831-INT-ET must be installed for before the 831-INT-ET system boots
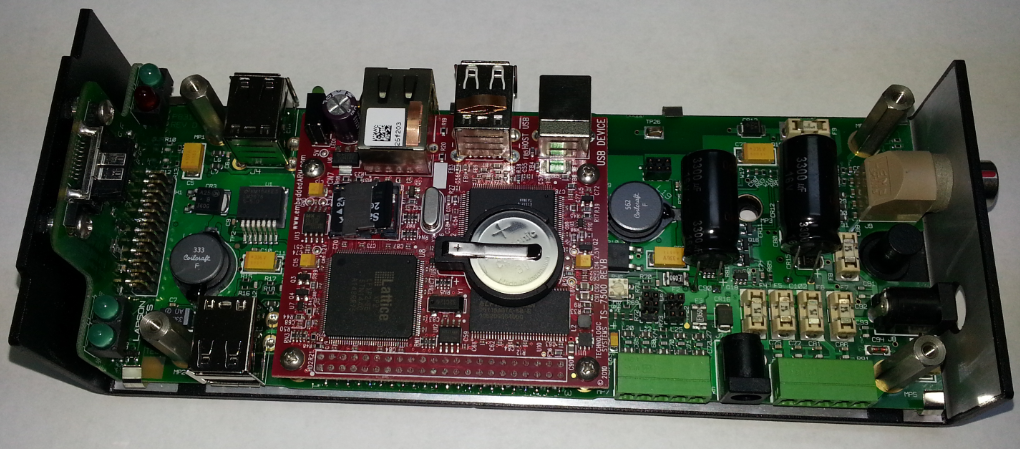
1 What is the difference between the 831-INT and 831-INT-ET?
The 831-INT has the following summary features:
In addition to the 831-INT features, the 831-INT-ET adds network communications capability to the 831 SLM, by adding the following features:
· Embedded Single Board Computer (SBC).
· Single RJ45 Ethernet connector.
· Additional USB Ports A and B (as part of SBC). Connect USB Port B to the 831 SLM’s USB port.
· Ethernet connection enables faster connection speeds, real-time streaming of data, and also remote firmware upgrade.
For more information please refer to the I831.04 831-INT/831-INT-ET Technical Reference Manual.
2 What are the differences between the various revisions?
Differences between the various revisions of the 831-INT/831-INT-ET are listed below in Table 1. Features not listed in the table are common to all versions.
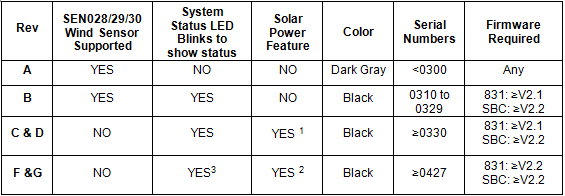
Table 1. Differences between various 831-INT/831-INT-ET Revisions
1 The system will power off when the battery voltage falls to the external power shut-off voltage as set in the Model 831 (default=10.8 volts), and will power up when the battery voltage returns to 11.6 - 12.3 volts.
2 The system will power off when the battery voltage falls to the external power shut-off voltage as set in the Model 831 (default=10.8 volts), and will power up when the battery voltage returns to 12.5 volts for at least 2 minutes.
3 The system status LED has enhanced functionality.
3 New features introduced in Revision G
The 831-INT(-ET) has been enhanced to provide improved protection to vulnerable Flash Memory chips along with the addition of other feature.
To take full advantage of the new 831-INT-ET features, use Model 831 firmware V2.2 or later.
Feature Summary:
- The watchdog for the single board computer in an 831-INT-ET and the 831 are now independent. If the SBC fails and requires a watchdog reset, the 831 will no longer be rebooted but will remain operational
- SBC power on time has been shortened
- The system status LED (Mains Status) has been enhanced to show the following information
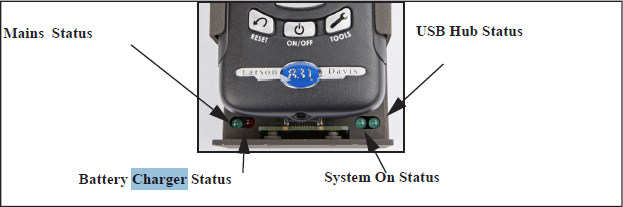
- The Battery Charger Status LED has been enhanced and the LED will blink fast when there is a fault, either a thermistor fault or no battery found
- The threshold for system power on when battery is recharged is now 12.5V for at least 2 minutes
4 What is required to replace an 831-INT rev A in an EPS031 or EPS032 system with a later revision?
The enclosure for 831-INT/831-INT-ET became 1/8” thicker after revision A. Because of this size difference, the two mounting brackets below must be ordered and replaced when updating from a revision A 831-INT:
Replacing these brackets in an EPS031/EPS032 system involves removing all the equipment from the box to gain access to the back plane of the EPS031/EPS032. It’s estimated this procedure will take 30 to 60 minutes to perform.
The above procedure is not necessary for newer EPS031/EPS032 systems as they already come with the modified M831.56 and M831.57 brackets installed.
5 Is my 831-INT rev A or 831-INT/831-INT-ET rev B repairable?
If an 831-INT rev A or 831-INT/831-INT-ET rev B cannot be repaired the entire unit will be replaced using later revision product. If a revision A 831-INT is replaced, the M831.56 and M831.57 brackets will also require replacement if used in the system. If a revision B 831-INT(-ET) is replaced, then only the M831.56 rotating bracket may need to be replaced.
6 How do I upgrade firmware in an 831-INT-ET?
a) Check 831-INT-ET firmware revision using SLM Utility G3
b) 831-INT-ET firmware version is prior to version 2.2, the upgrade is made by replacing the SDflash chip that is inside the 831-INT-ET. This can be done in the field and requires about 5 minutes and a Phillips screwdriver 
a. Request a new chip from Larson Davis by contacting customer support
b. Remove the screw for mounting the 831
c. Using a Phillips screwdriver, remove the 4 screws from the top of the 831-INT-ET and remove the top cover
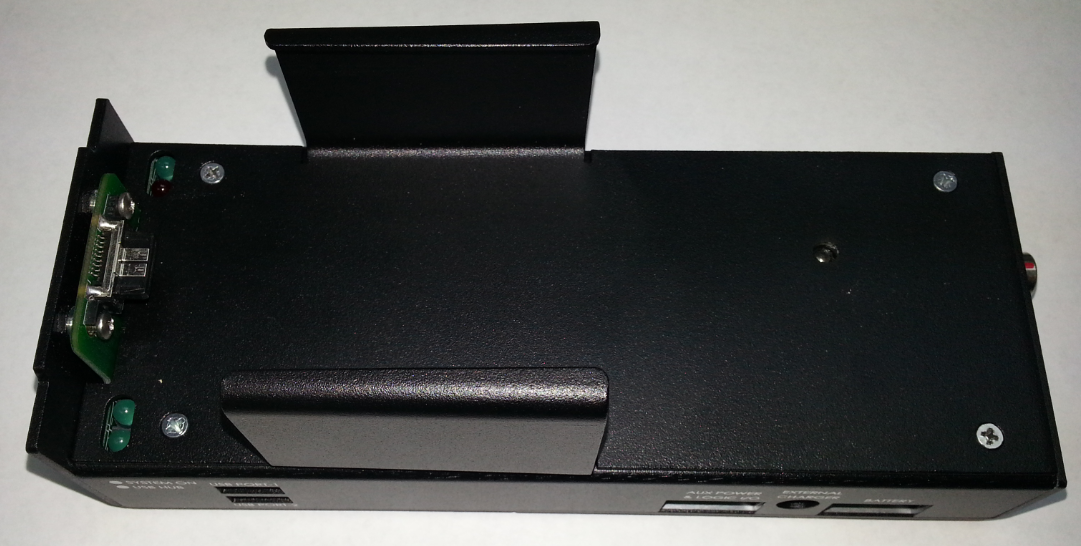
d. After removing the top cover, the U-shaped metal piece will lift off over the connectors exposing the circuit board. Use proper grounding techniques to avoid static discharge to the circuit board or any component on the board. Static discharge can cause permanent damage.
e. Locate the chip carrier and slide the lid back (direction of arrow) slightly to release the chip
f. Remove the old chip and insert the new chip in the lid, push down the lid and slide forward to lock the chip.
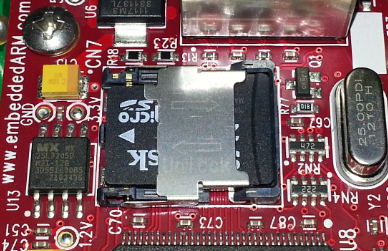
g. Reassemble the system
c. 831-INT-ET firmware version 2.2 or later then SLM Utility G3 can be used to load new firmware.
Larson Davis instrumentation is used in community and environmental noise monitoring, measurement of building acoustics, managing worker exposure to noise and vibration, and various automotive, aerospace, and industrial applications. Larson Davis is a division of PCB Piezotronics, Inc., a wholly owned subsidiary of Amphenol Corporation.
Full About Us
Subscribe to our newsletter for the latest technical news, training opportunities, & product updates from Larson Davis.
| SensorlineSM | |
| Sales and Technical: |
3425 Walden Ave
Depew, NY 14043 USA
SensorlineSM
716.684.0001
Email Sales Support
Email Technical Support
Sales and Technical:
716.926.8243
Cookie Preferences | Privacy Policy | Website Terms of Use | Factory Calibration | Equipment Rental | Product Repair | Amphenol Human Trafficking and Slavery Statement | CA Prop 65 Warning
© PCB Piezotronics, Inc. – all rights reserved. In the interest of constant product improvement, specifications are subject to change without notice. Detailed trademark ownership information is available at www.pcb.com/trademarkownership.